

Your life is a function of your credentials. Protect them well
Letting Google Chrome save passwords for various web sites you visit and happily accepting those pre-filled passwords on subsequent visits has become second nature to most of us. The convenience factor embedded into this practice offsets any security concerns, leading to a position where actual guarding of all of our credentials gets outsourced to a third party. In effect, most of us, over a period of time, have passed on ownership and controls of our digital lives to someone else. I consider myself reasonably security-aware and am proud to be quite technology-oriented but I must admit with all honesty, it was not until recently when I stumbled upon an eye-opener article to realize that over the years I had lazily been lending myself to a potential security disaster. In 2022, when our lives have become much more intertwined with cyberspace than ever before, I would urge my readers to see protection of those credentials as more of a fundamental duty rather than just another responsibility. Hopefully this article will help you with that fundamental duty.
The problem with password management browser extensions
So what exactly is wrong with password managers of the kind offered by popular browsers like google chrome? Based on my own experience and a read up of a number of articles/posts on the internet, here's a brief summary:
1. All your passwords live somewhere in the cloud. This is data that means your life to you but is owned and controlled by someone else, most likely by a company that is driven primarily by profit-generating motives.
2. Not all browsers offer the ability to protect/encrypt these saved passwords with a master password. Google chrome, indisputably the most popular browser, certainly does not. With such a set up, a hacker who could crack their way through to your primary account or could somehow gain access to your computer, tablet or phone would immediately get unhindered access to all your saved credentials and therefore, potentially, to all the keys to your digital life. This is a recipe for disaster and perhaps the single biggest issue with this class of password managers. Any good password manager should require you to log in with a distinctly separate master password and should lock your passwords after a specified period of time (usually an hour). More advanced ones should go to the extent of challenging you with 2-factor authentication, for example by sending an OTP to your mobile device.
3. Passwords generated by add-on browser extensions are usually rather simple and protected with less than enterprise-class encryption algorithms.
4. A password manager offered with a browser is just an add-on feature for a software that, at the end of the day, is essentially a browser. Your browser was never meant to be a password manager, which makes that add-on a bit of a half-hearted approach to professional management of credentials.
5. A password management extension offered by a browser will only work with that browser, leading to immense inconvenience if you choose to work with some other browser. For example, Google Chrome and Firefox, the two most popular browsers, refuse to see each other's saved credentials.
Paid password managers
Of course, there are several enterprise-grade password managers available out there. A quick google search immediately brings prominent names like Dashlane, Roboform, Lastpass, Nordpass etc to your attention. But most of them suffer from the the big drawback that they require a monthly or annual subscription fee, which is never modest, by any standard. Some do offer free packages, but they come with so many restrictions that they render them useless for an average user. The most common restriction is to limit usage to a single device or to a single device type (desktop or mobile), which I guess would put off most people. However, from a security point of view, none of them offer a solution that solves problem # 1 that I have pointed out in the list above. These paid password managers may offer to adequately protect your passwords with state-of-the-art encryption, master passwords etc but at the end of the day, your credentials still live somewhere in the cloud and are owned by someone else.
The case for Passbolt
Which brings us into the realms of an enterprise-grade password manager that is free and that can be self-hosted. Self-hosting means the manager runs on a server within your home or office LAN or at least on a machine that you own and control (such as a cloud-based compute engine) and which persists data-at-rest on a storage media that, similarly, you own and control. To be honest, the list of free, self-hosted password management solutions is a rather short one but fortunately, I could spot a credentials' manager called Passbolt, that meets all my requirements. Passbolt, like others, offers a paid SaaS-based solution but also offers a free, open source, self-hosted community edition that does what I expect a password manager to do for me.
The self-hosted solution is a typical LAMP-based (Linux, Apache, MySQL, PHP) stack with an additional GPG (GNU Privacy Guard) key-based cloak of security thrown around its components. Your super secret credentials live as encrypted strings in you very own MySQL instance. Passbolt offers extensions for popular browsers like Google Chrome, Firefox, Edge etc which makes it very convenient to work across browsers. These extensions, once configured to talk to your passbolt server, easily allow you to save credentials, browse through them and auto-fill password fields as you navigate your favourite websites. However, since with a self-hosted solution you have chosen to keep exposure of your credentials limited to your LAN or to a server in the cloud that you own, you will need to arrange connectivity from the browser you use to the server that hosts your passbolt. This could be in the form of a simple SOHO LAN link, a VPN connection to your SOHO LAN, a VPN connection to your cloud account or simply a secure HTTPS access to your cloud server. In my case, my passbolt server is hosted on a Debian box running in my garage which I can access over my LAN when I am at home or over the VPN when I am away but I would like to clarify that this write up does not go into the details of how one can provision network connectivity to the passbolt server itself.
Installing Passbolt
The following sections describe how you can get passbolt up and running on a LAMP instance. It is assumed that a LAMP stack is already available and accordingly, the instructions below are focused just on installation of Passbolt without getting into details on how software like Apache2, MySQL etc (part of the LAMP stack) can initialized.
Set up the database
Login as root/admin to your MySQL database instance and create a new database called passbolt. Create a user called passboltuser with a password and grant all privileges on the database passbolt to the user passboltuser. Make sure you flush privileges on the database to make these changes immediately effective.
mysql -u root -p
mysql> create database passbolt;
mysql> CREATE USER 'passboltuser'@'localhost' IDENTIFIED BY 'mypassword';
mysql> GRANT ALL PRIVILEGES ON passbolt.* TO 'passboltuser'@'localhost';
mysql> FLUSH PRIVILEGES;
mysql> exit;
Install packages and dependencies and set permissions
cd /var/www/
sudo git clone https://github.com/passbolt/passbolt_api.git
sudo mv passbolt_api passbolt
sudo chown -R www-data:www-data /var/www/passbolt
sudo apt install php-imagick php-gnupg php7.4-common php7.4-mysql php7.4-fpm php7.4-ldap php7.4-gd php7.4-imap php7.4-json php7.4-curl php7.4-zip php7.4-xml php7.4-mbstring php7.4-bz2 php7.4-intl php7.4-gmp php7.4-xsl
systemctl restart apache2
cd /var/www/passbolt/
sudo apt install composer
sudo mkdir /var/www/.composer
sudo chown -R www-data:www-data /var/www/.composer
sudo -u www-data composer install --no-dev (to the prompt on setting folder permissions, answer Y)
Generate encryption keys
Run the following command to generate a new key pair.
gpg --gen-key
You will be asked to enter your name and email address. If you are asked to set a passphrase, skip it by pressing the Tab key and selecting OK, because the php-gnupg module doesn’t support using passphrase at the moment. Copy the private key to the passbolt configuration location. Replace me@mydomain.com with the email address supplied when generating the PGP key.
gpg --armor --export-secret-keys me@mydomain.com | sudo tee /var/www/passbolt/config/gpg/serverkey_private.asc > /dev/null
Similarly copy the public key as well.
gpg --armor --export me@mydomain.com | sudo tee /var/www/passbolt/config/gpg/serverkey.asc > /dev/null
Initialize the www-data user’s keyring.
sudo su -s /bin/bash -c "gpg --list-keys" www-data
Configure Passbolt
Make sure you are in /var/www/passbolt/ directory.
cd /var/www/passbolt/
Copy the sample configuration file to a production configuration file.
sudo cp config/passbolt.default.php config/passbolt.php
Edit the configuration file config/passbolt.php. First, find the following line.
'fullBaseUrl' => 'https://www.passbolt.test'
Replace the URL with your own URL, like https://host:port e.g https://xyz.lan:1234. In the database configuration section, enter the database name, database username and password you created above.
    // Database configuration.
    'Datasources' => [
        'default' => [
            'host' => 'localhost',
            //'port' => 'non_standard_port_number',
            'username' => 'passboltuser',
            'password' => 'mypassword',
            'database' => 'passbolt',
        ],
    ],
In the email configuration section, specify the SMTP hostname, port number, login credentials, so your passbolt can send emails. Usually you need to use port 587 to sumbit emails to remote SMTP server. Make sure you set tls to true, so the SMTP transaction will be encrypted. Also set the From: email address and From name.
    // Email configuration.
    'EmailTransport' => [
        'default' => [
            'host' => 'mail.yourdomain.com',
            'port' => 587,
            'username' => 'me@mydomain.com',
            'password' => 'secret',
            // Is this a secure connection? true if yes, null if no.
            'tls' => true,
            //'timeout' => 30,
            //'client' => null,
            //'url' => null,
        ],
    ],
    'Email' => [
        'default' => [
            // Defines the default name and email of the sender of the emails.
            'from' => ['passbolt@your_organization.com' => 'Passbolt'],
            //'charset' => 'utf-8',
            //'headerCharset' => 'utf-8',
        ],
    ],
In the gpg section, enter the GPG key fingerprint like below. You need to delete all whitespaces in the fingerprint.
'fingerprint' => 'XXXX1111YYYY2222XXXX1111YYYY2222XXXX1111YYYY2222',
You can get your key fingerprint with the following command. Replace me@mydomain.com with your email address when generating the PGP key pair.
gpg --list-keys --fingerprint | grep -i -B 2 'me@mydomain.com'
After entering the fingerprint, uncomment the following two lines. Then, save and close the file.
'public' => CONFIG . 'gpg' . DS . 'serverkey.asc',
'private' => CONFIG . 'gpg' . DS . 'serverkey_private.asc',
Run the installation Script
Run the install script as the www-data user.
sudo su -s /bin/bash -c "./bin/cake passbolt install --force" www-data
During the installation, you will be asked to create an admin account. Once you create an account, you will be provided an URL to finish the installation in a web browser. Before doing that, we need to configure the Apache web server to be able to handle requests for passbolt.
Configure Apache for Passbolt
Apache configuration involves creation of a virtual host and pointing it to the base folder, as follows
## This portion handles passbolt requests hitting port xyz over secure URLs
 <VirtualHost *:xyz >

    ServerName myserver.com
    ServerAlias myserver.com
    RewriteEngine  On

    # define a log level if required
    #LogLevel alert rewrite:trace3

    ErrorLog /var/log/apache2/passbolt_error_log
    CustomLog /var/log/apache2/passbolt_access_log combined

    SSLEngine On
    SSLCertificateFile /etc/ssl/certs/myserver.crt
    SSLCertificateKeyFile /etc/ssl/certs/myserver.key

    DocumentRoot /var/www/passbolt/webroot/

    <Directory />
    	Options FollowSymLinks
    	AllowOverride All
     </Directory>

     <Directory /var/www/passbolt/>
    	Options FollowSymLinks MultiViews
    	AllowOverride All
    	Order allow,deny
    	allow from all
     </Directory>

 </VirtualHost>
Reload Apache for the changes to take effect.
sudo systemctl restart apache2
Access Passbolt
If all has worked to plan, passbolt should be available under the following URL (xyz being the port passbolt has been configured to listen on):
https://myserver.com:xyz
Passbolt Browser Extensions
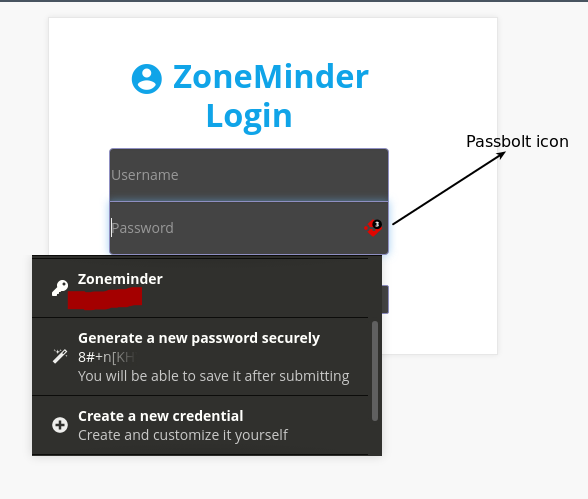
As mentioned above, passbolt extensions are available for all major browsers. For Google Chrome, simply go to the Chrome web store, add the passbolt extension (here's the link) and point it to your brand new installation. You will need to authenticate with your pass phrase. Once configured, you should start seeing passbolt icons embedded into username and password fields of various sites you visit. The extension allows you to save credentials, browse them amd use them on various websites. The functionality that this extension offers is similar to that offered by the default chrome passowrd manager and there are a lot of other features to explore.
The following screenshot shows how the passbolt extension integrates with Google Chrome (the example shows an application called ZoneMinder that I am trying to log in to):
Happy Passbolting 😊