Introduction
When you bought your PC you probably ordered some decent hardware including a powerful CPU, plenty of RAM and maybe four or five times the disk space you would normally need. Most of the computing power you spent your money on may well be idling away in an obscure corner of your home. A look at the performance stats of your PC may suggest you could throw much more work at it than it currently handles. So why not get your own PC to host your website rather than messing about with online web hosting providers who impose yearly fees and restrict you to rather narrow technology stacks of their choice? With your website completely under your control and with so many exciting open-source technologies out there, the set of choices at your disposal would suddenly open up to be quite wide. Starting with something as simple as static HTML pages, you would have the freedom and flexibility to evolve a technology stack that you are comfortable with at a personal level and that also fulfils your business needs. Later, when your business grows to a point where that PC of yours begins to get grumpy, there would be nothing stopping you from renting a host on the cloud and executing a “lift and shift” of the stack on your PC onto your new provider. But until that happens, why not make the best of your home computer?Hosting a website on your home PC or laptop is probably much easier than you thought. The idea mainly revolves around adding capabilities to your PC to serve content and then making sure requests initiated for your web site from anywhere on the internet are somehow routed into your PC. This blog that you are reading is being served off my home PC which I set up a few months back on the lines described in this article. However before this gets too exciting and before you start tinkering around with things, you should make sure you do have the basic essentials to make such a thing happen. Here is a list of what you MUST have:
- 1. A mid-range desktop PC or a laptop to double up as a “host”.
- 2. A domain name that you own e.g www.mydomain.com
- 3. A broadband connection made available to the PC through a standard router, usually supplied by your Internet Service Provider (ISP)
- 4. A Dynamic DNS account
No rush, let us pick these ingredients up one at a time to try and understand what needs to be done on the various bits we need to change.
The Host – your desktop PC / Laptop
As the name suggests, your PC (or laptop) will “host” your web site. It other words, it will “serve” HTML content to parties that send request to it and will therefore be your server. The specifications of our host, in theory, would depend on the number of hits per unit time you expect but if your domain name is not yet known to the world and you are just initializing your web site, I would say any machine with a rather average processing power should suffice. In general, for anticipated traffic volumes not exceeding a couple of hundred requests per minute, I would be quite comfortable roping in a PC with something like an intel i3 processor + 2 GB of RAM and some spare disk space (1 GB or so) to begin with.But before your PC is ready for this role, you need to create some content and be able to make your PC start “listening” for requests from external parties. So essentially you need to have a software process running on your PC that listens on an IP address / port combination and that knows where to find content on the PC that people are requesting for. There are a huge number of free / open source web servers out there that that can help you achieve this. If you are running windows, you already have IIS (Internet Information Server) which is a group of Internet servers including a web server but you need to navigate to the control panel and enable it before you can use it. Some Linux versions (Ubuntu for example) include a web server called Apache which also can be used for this purpose. However with these web servers in their plain vanilla form you can only get as far as serving static content off your web site. If you are also looking at ultimately making your web site functional or dynamic in some way (for example allowing users to fill up a contact form and send online queries to you), I strongly suggest you start with a server that offers dynamic content capabilities. Again, there are a lot of open-source options that you can choose from but the one that is by far the most popular (and also my favourite) is Apache Tomcat. It has been around for quite some time now and besides being a web server, it allows you to build Java Server Pages (JSPs) that produce dynamic content. These are slightly more complicated topics that you can safely ignore for now and live with the conviction that if you’ve chosen Tomcat for now, you have already begun to build a web site that is far more futuristic than is apparent at this stage. This amazing server is pleasantly lightweight, dead easy to configure and can have you up and running in minutes, as you will soon find out for yourself. Do be aware however that the simplicity of Tomcat is in no way an indication that it is only meant for school or university projects. I have seen enterprises with turnovers to the tune of a couple of 100 million pounds run their main online applications on Tomcat.
You can very easily download your copy of Apache Tomcat version 7 from here. Make sure you download the version that is correct for your PC’s operating system. The downloaded artifact will be a zip file, the contents of which you can extract to any chosen location on your PC. On my own PC, I have extracted the contents directly onto the C drive. Upon extraction you should see a folder called apache-tomcat-7.0.67 at the location you chose to extract the contents to (C://apache-tomcat-7.0.67 in my case).
I’m assuming you have prepared the content for your web site and that in the simplest of cases this is represented by a bunch of static HTML files. Identify the HTML file that constitutes your home page – the page you expect your online user to first see when they hit your web site. This HTML file could have any name but the convention is to call it index.html. If you choose to give it any other name, a further configuration of Tomcat will be required which you can catch up on later.
Tomcat 7 needs your PC to have java 6 installed on it. Most windows installations already have java because a number of other software on the system may have needed it and installed it in the past. It is quite simple to run a check for java. If you open a command prompt window and run the command java –version, it should tell you if you have java or not and if you do, which version of java sits on your PC. If you don’t find java on the PC, you can download and install it in minutes from here. Having made sure you have an installation of java, go to the folder C://apache-tomcat-7.0.67/webapps/ROOT and delete everything there. Then place the contents of your website into this folder, making sure index.html (your home page) is located directly under ROOT. Now it is time to start your server up and that is simply a matter of going to C://apache-tomcat-7.0.67/bin and double-clicking on a file called startup.bat. Assuming your PC has a java runtime environment installed on it you should see a command prompt window fire up, print out some log statements and the system finally telling you that the server started in so many milliseconds. At this point you basically have your website up. To verify this, open a browser, type in the following URL and hit enter
http://localhost:8080
If all has worked, you should see your home page in your browser. Feel free to navigate around and get the thrill of it
A Domain Name
If you are about to launch a new website of your own, you must have thought of registering a domain name or you may already be the owner of a domain name that you now want to activate. If not, you need to get that out of the way first. There are several websites where you can purchase a domain name of your choice (subject to availability) but the ones that appear to be the most popular are uk.godaddy.com and www.123-reg.co.uk. Most of these sites require you to create an account, choose a domain name, choose the duration (number of years) for which you wish to own the domain name and finally pay for the registration. For the purpose of this discussion, we will assume that the domain name we have chosen is www.mydomain.comOnce you have purchased a domain name, there is a little more work to be done while you are still logged into your domain registration account. To dwell upon some basics for a moment, a domain name needs to be mapped to an IP address so that traffic meant for the name can be routed to the actual system that is supposed to receive / handle it. This mapping between a domain name and an actual IP address is maintained in special servers called Domain Name Servers (DNS) available across the internet. Most likely the agency that you just registered your domain name with will also offer a DNS service and by default will have set your domain name to use their DNS servers for this mapping. You can choose to keeps things as they and if that is the case, do note down the names of the DNS servers that the agency has tied your domain name to. Alternatively, you may want to use some other DNS provider, for example No-IP. If you wish to use an external DNS provider, you need to tell your domain name provider that you have chosen to do so. The website that you registered your domain name on will have a link to something like “DNS Management” or “Change Name Servers” or similar. Clicking on the link should take you to a page that allows you to change your DNS provider. Usually you will need to fill up the name of a primary DNS server and 2 to 3 alternative (secondary or failover ones). These details will be made available to you by the Dynamic DNS provider that you will register with in fulfillment of the basic requirements that I have listed above. For details, read the section below on how to create a dynamic DNS account. In my case, I chose to have No-IP as my DNS provider and accordingly, the DNS server names that I provided to the agency I registered my domain name with were ns4.no-ip.com as primary and ns1.no-ip.com, ns2.no-ip.com and ns3.no-ip.com as secondary / failover.
A DNS Mapping
So now you have a domain name that will eventually map to the PC hosting your web site and a DNS service provider that will maintain the necessary domain name to IP address mapping. As discussed above, the DNS provider could be the one given to you as default by the agency you registered your domain with or an entirely different DNS provider that you chose, like No-IP. The next bit of wiring you need to do is supply your IP address to the DNS provider so that it routes requests for your website to the intended IP address.So what is the intended IP address then? It is the public-facing IP address of your home internet router assigned to it by your ISP. It is quite easy to find out the public facing IP address of your router. Just point your browser to an IP-revealing online utility like this one and it reports back the public facing IP address of your router.
Another step closer but not quite there! You have a domain name, a public facing IP address and a DNS provider meant to map the two together to complete the circuit. So all you do is log on to your DNS account (the one provided to you by the agency you registered your domain name with OR the external one, like No-IP, that you may have chosen) and create a mapping for your domain name and the public facing IP address of your router. Most DNS providers offer links to pages that allow you to add your domain name, an IP address against it and publish the mapping. Once the map is published, it may take a few minutes for the “DNS Record” to spread across the internet.
So far so good. You have wiring in place to make sure requests for your website land up on your home router. But what does your router do with such a request? After all, the router is supposed to double up as a firewall too and it cannot simply pass on a request it just received on its public-facing side to your home PC. Secondly, your home network may have several devices connected to the router (mobile phones, TVs, blue-ray players etc) and normally the router would not know which device to forward the requests to. We need to overcome these hurdles by setting up what is called a “Port Forwarding” rule on the router. This is discussed in the next section.
The Router
Your internet router is quite central to what we are trying to accomplish here and is therefore a piece of equipment that needs to be understood well. Most of the home routers I have peeked into support the two features we are mainly concerned with in this context – Dynamic DNS and Port Forwarding. BT home hub, Virgin Super Hub, Linksys, Unifi Edgemax are some specific routers I have personally played around with and have every reason to believe Dynamic DNS and Port Forwarding are available as standard features in any run-off-the-mill router meant for home use. These simple networking features may sound daunting at this stage, especially if you are a networking novice but are actually quite easy to tweak. We will deal with Dynamic DNS in the next section. Let’s understand what needs to be done in terms of port forwarding first.That router sitting somewhere in a corner of your room for ages and occasionally blinking away a few of its LEDs at you is much more intelligent and capable than you may have realized. It is the ring leader of your home network – assigning IP addresses to the tens of devices at your home that connect to the internet, managing how your devices talk to each other, shielding away your devices and the sensitive data they may have from malicious hacker attacks, forwarding requests from your home network elements to the internet etc. It has a set of rather restrictive “firewall rules” that make it possible to block malicious request from the open internet from landing on one or more devices you may have on the private site of the router. To allow a request for your web site to hit the PC hosting your content you will need to instruct your router to let the request through. You do this by setting up a port forwarding rule on the router and to get anywhere near that, you need to log on to your router first. Most routers have a web server running inside them which you can access by typing http://IP-address-of-Router into the address bar of a browser and hitting enter. So where do you find that IP address? You can get the IP address of your router by firing up a command prompt window on your PC and running the command ipconfig. The IP of your router will be displayed against the “Default Gateway” entry as shown below

Based on the above picture, the URL with which you can access your router is http://192.168.1.1 Another important piece of data to make a note of here is the private (home network) IPv4 IP address of your PC itself which I have highlighted in yellow. You will need this IP address when configuring your router for port forwarding which I have explained below.
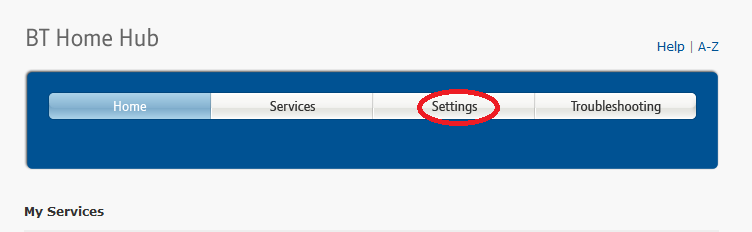
The router will challenge you for credentials which can be found either on the back side of the router or in the documentation provided by your ISP when they had installed the router at you home. Enter the username / password and log on to your router. There is no standard GUI pattern that different routers adhere to and therefore your navigation to the section on port forwarding will depend on the specific router you are using. Screenshots below illustrate (as an example) how you can set up port forwarding on a BT Home Hub 3 router
When you see the router home page, click on “Settings”
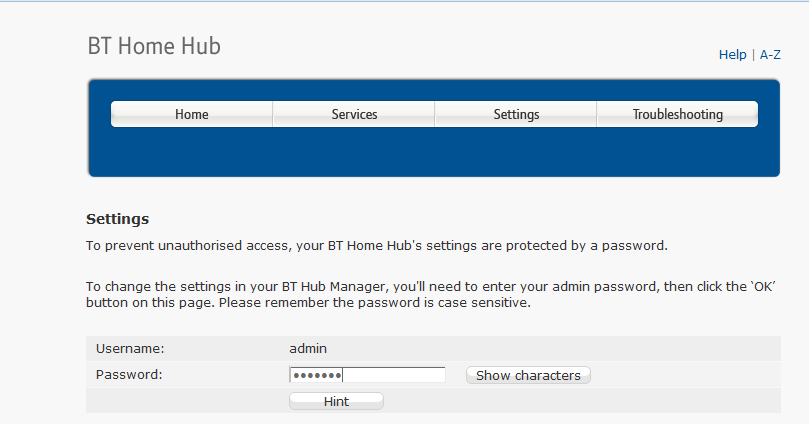
The router challenges you for a password. The default user name on BT routers is admin. Supply the password for admin and hit enter
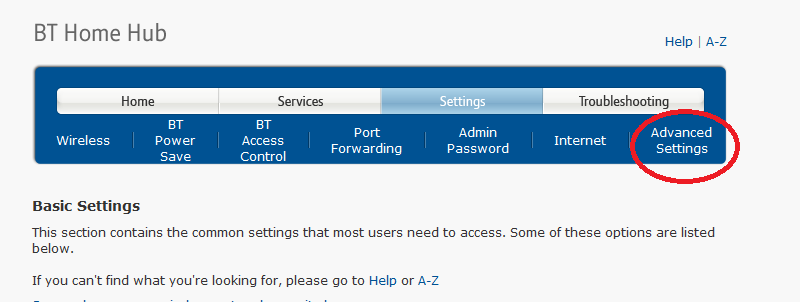
Go to “Advanced Settings”
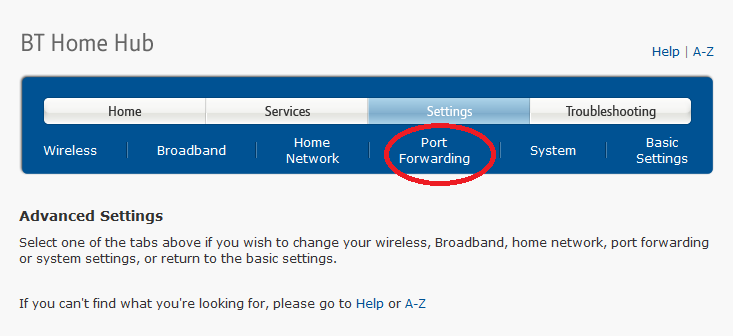
Click on “Port Forwarding”
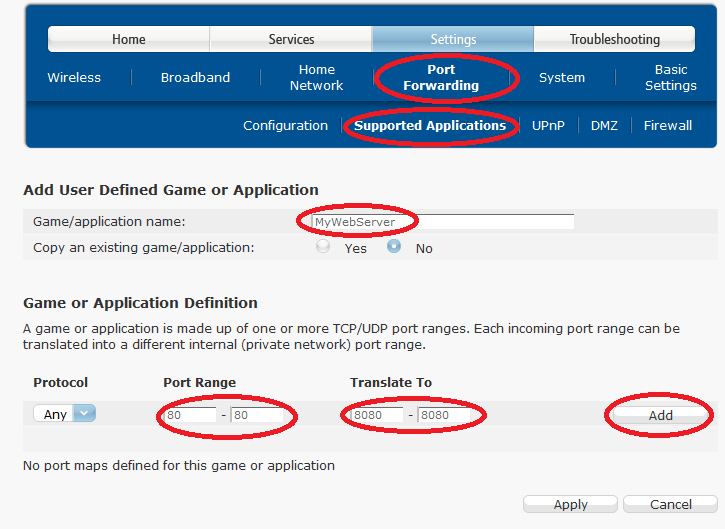
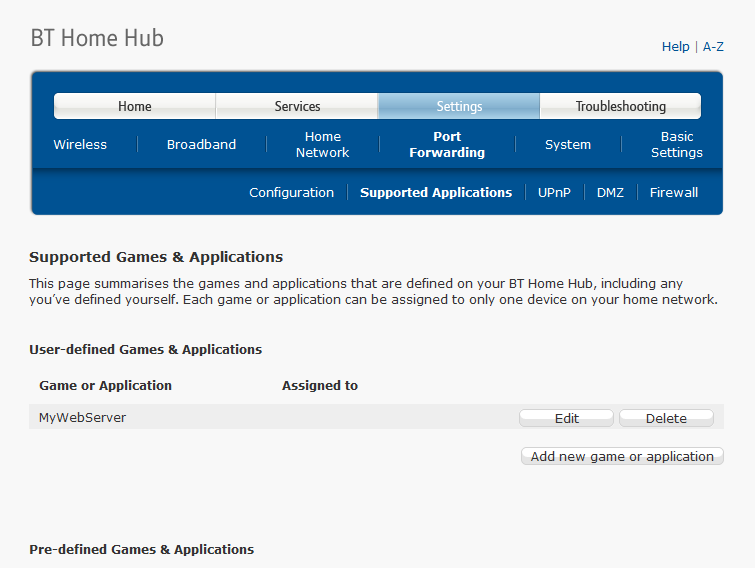
Within port forwarding, go to “Supported Applications” –> “Add new game or application”. Here you need to define a port translation rule for your web application. We know we have a web application (hosted by Apache Tomcat) on your PC that listens on port 8080. We need to give this application a name. Let the router know your web application as “MyWebServer”. The router will be receiving HTTP requests for http://www.mydomain.com with no port number specified. For the HTTP protocol, requests without a port number default to port 80. In essence, what we are telling the router on this page is that all requests received on port 80 should be translated to port 8080, the port on which our web application listens.
Add the port translation rule by clicking the “Add” button.
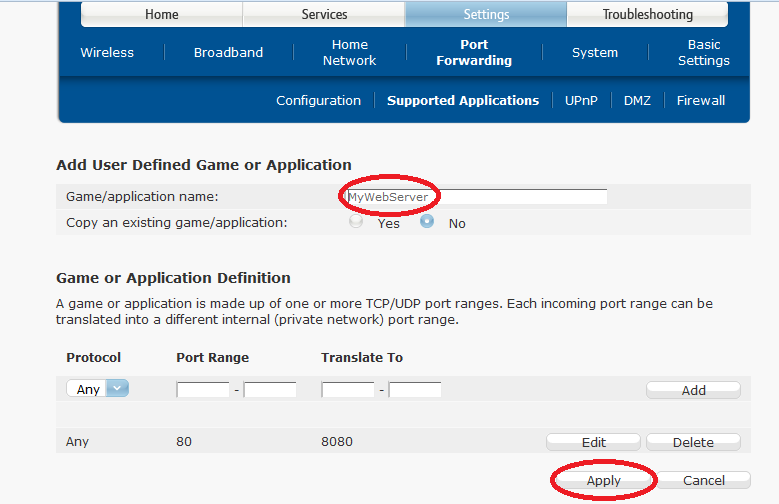
Once the translation rule has been added, apply it to “MyWebServer” by clicking “Apply”.
The newly created application (port translation rules hidden) will be displayed as shown below:
Once the application has been created, navigate to “Port Forwarding” –> “Configuration” as shown below. On this page, you map the newly created application to the private (home network) IP address of your PC. The application you just created should be available in the applications drop down list and I’ve already explained how to determine the private IP address of your PC. Once this mapping is entered, click “Apply”
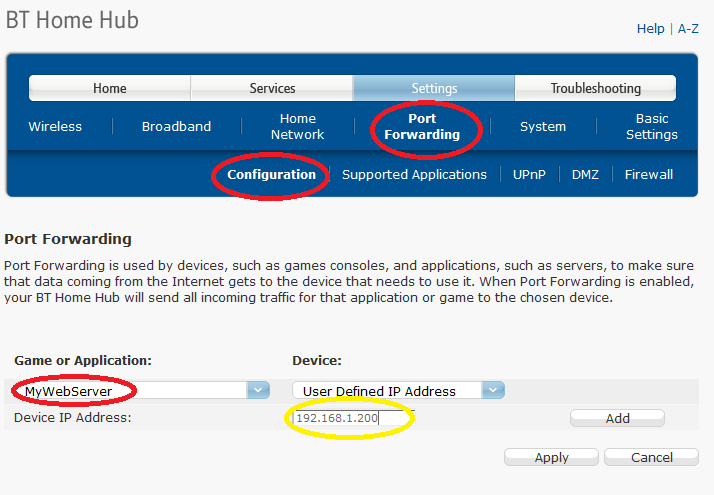
With the above in place, your router is ready to forward requests for http://www.mydomain.com (received on port 80 on the public side) to port 8080 of your hope PC having an IP address of 192.168.1.200. As mentioned earlier, different routers have different admin screens and the pictures I’ve shown above will most likely not match the pages displayed by your specific router if it is not BT Home Hub 3. However, the process essentially remains the same and if you get stuck by any chance, just google the subject for the make and model of your router and there should be plenty of material with examples out there.
With that we have our essential wiring in place and if everything has worked, you should be able to see your web site when you type in www.mydomain.com into your browser and hit enter. To ensure this really works from anywhere on the open internet, try hitting your website from a mobile phone connected to the internet over 3G or 4G rather than through the wifi that your router emits.
So are we done? Well, we are nearly there. To understand what still remains missing at this stage, you need to understand that two IP addresses in the network chain we have created are actually temporary and that they may change at any time, thereby breaking one or more links in the chain. One of them is the private (home network) IP address of your home PC. The other one is the public IP address of your router.
When you switch your computer on, it connects to your router and requests the router to allocate an IP address to it. The router acknowledges the request, assigns an available IP address to the PC and starts treating the PC as a network entity on your home network. This process of dynamically assigning an IP address to the requester works according to a networking protocol called the Dynamic Host Configuration Protocol (DHCP). Usually DHCP requires the IP address to be allocated with a finite lease time which may be 24 or 48 hrs, depending on the configuration of your router. When the lease expires, the IP address is recycled and a fresh IP is allocated to the network entity. Therefore, it is quite possible that the current IP address of your PC (192.168.1.200) will expire after 24 hrs and the PC will get a new IP address like 192.168.1.XYZ. As soon as this happens, the port forwarding rule you just set up in your router will be rendered useless.
But don’t lose heart, there is a work around. What you need to do is either configure your PC to have a static IP address or configure your router to always allocate the same IP address to the PC. Configuring your PC to have a static IP address is easier and can be done in a few steps on most operating systems. On Windows 7 go to Control Panel –> Network and Sharing Center –> Change Adapter Settings –> Local Area Connection –> (Right Click) –> Properties –> Internet Protocol Version 4 (TCP/IPv4) –> Properties. You should see the following dialog box. Fill it up as shown below and apply the changes:
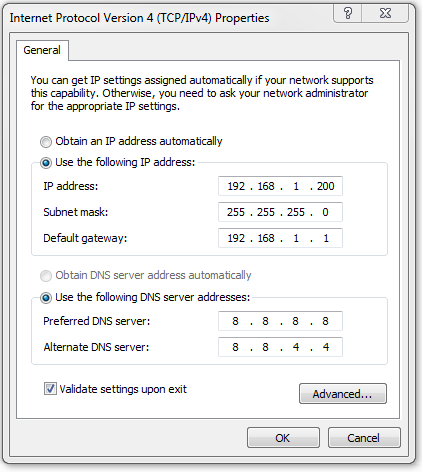
Windows will run some network diagnostic tests and will apply the changes. Once these settings have been successfully applied, you can be sure that your PC will always have the same IP address (192.168.1.200) and that the port forwarding rule in your router will always work.
The other IP address that keeps changing is the public IP address of your router. Addressing this dynamism is a bit trickier but again, there is a work around and this time on its “Dynamic DNS” to our rescue. I’ve explained the concept below.
Dynamic DNS
Just as your PC is a client for your router, the router itself is a client of your ISP. When you switch your router on, it connects to your ISP and requests for an IP address. The ISP assigns an available IP address to the router and connects it to the rest of the internet. This IP address too has a lease time associated with it which may be 24 or 48 hours depending on the ISP policies. When the lease period expires, the ISP assigns a fresh IP address to your router. Alternatively, your router will almost definitely get a new IP address if you decide to reboot it. In other words, the public-facing IP address of your router is dynamic.We saw it was easy to configure your PC or your router to make sure your PC always gets the same IP address since both of these are within your control. But with an ISP things get difficult. Unless you have purchased a dedicated or commercial internet connection from your ISP, they will refuse to allocate a static IP address for your account. For usual home internet connections, the router’s public IP address WILL remain dynamic. And as soon as the router’s public IP address changes, the DNS mapping we put into place earlier is rendered useless. Unless we manage to find a way to update the mapping with the latest IP address as soon as the address changes.
This is exactly what Dynamic DNS is all about. When you purchase a Dynamic DNS account from a provider, they allow you to “publish” fresh mappings of hostname to IP addresses at regular intervals. But who is going to do this job? Surely you can’t afford to wake up every night to check if the IP address of your router has changed and publish a new DNS record if it indeed has.
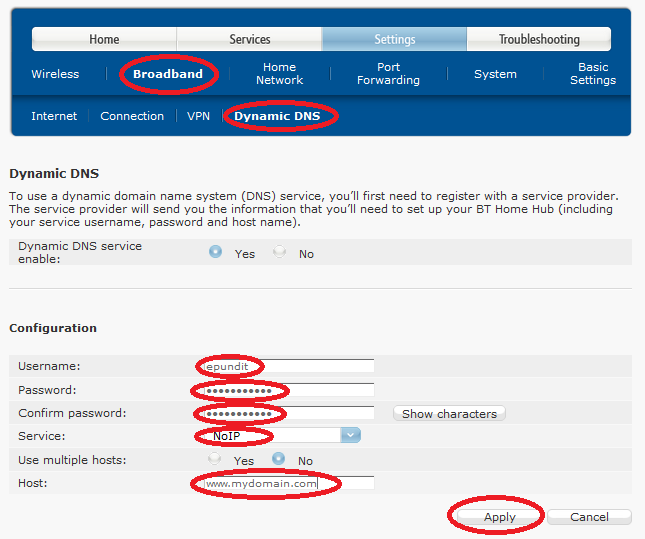
Your good old router to the rescue again. Most home routers offer support for Dynamic DNS. All you do is tell the router what your domain name, who your DNS provider is, what your account credentials are and whenever the router realizes its public IP address has changed, it automatically publishes a new DNS mapping. The following screenshots show how you can configure a BT home Hub 3 to support Dynamic DNS for your domain. You need to log on to your router and navigate to Settings –> Advanced Settings –> Broadband –> Dynamic DNS
You may need to wait a few minutes for this to work since the DNS mapping takes some time to get cascaded on the open internet. Should you now need to reboot your PC or you router, the various network links you have put in place should remain self-maintaining, ensuring your web site is always available.
So that’s your very own website coming off your very own PC!! There’s a lot you can do as the owner of your server. To give you just one example, navigate to C://apache-tomcat-7.0.67/logs and you will find various kinds of log files there giving out information on who visited your site, from which IP addresses and if your site was ever crawled by a search robot like google.