
The need for a custom router
I felt a pang of utter dismay when I measured my internet speed after having painstakingly, very optimistically configured my beloved Ubiquiti Edgemax (ERL-3) router to hook up to a recently subscribed NordVPN account over the standard openvpn protocol. Down from a solid 210 Mbps promised and consistently provisioned by my ISP, this poor little box had stooped to a hopeless 6 Mbps, with CPU shamelessly hovering around the 100% mark during speed tests I ran on the network. Several tweaks and unconvincing exchanges on ubiquity forums later, I was convinced that if speed with VPN privacy was the seemingly difficult combination I dreamt of, it pretty much was time to change my router.
And with that, I embarked on yet another exciting networking journey.
Hardware and software selection
Initially I tinkered with the idea of putting pfsense on a refurbished SFF HP i5 / 8GB I had been eyeing on ebay for some time but there was no way the architect in me would let me go down the route of over-allocating hardware resources for a given purpose, regardless of the low price tag on the machine itself. For just a router, this grumpy HP, despite its SFF, would resemble a monster in my already cramped server rack but for me, the real put-off came with a realization that over a few years the amount of electricity it would guzzle up would definitely offset any savings I could home to make now. Moreover, who doesn’t get excited at the prospect of buying shiny new hardware for bright new ideas?
Which set me thinking about this new Raspberry Pi 4B (8 GB RAM) model that was launched last year. With a quad-core processor, a proper gigabit ethernet port (as opposed to inefficient USB–to–ethernet adaptations in previous models) and a generous 8 GB of RAM, I guessed this little wonder could prove to be exactly the hardware host I needed for a custom router. The problem with raspberry pi 4 though is that it has very little support in the open source firewall software world. Pfsense has never been known to work on a Pi and forums on router software like DD-WRT, AdvancedTomato etc seem to convey just confusion on compatibilities. That effectively left me toying with the idea of trying OpenWrt, an ambitious piece of firewall software with immense community support, on a brand new pi 4 that blinked at me from its partially ripped packaging.
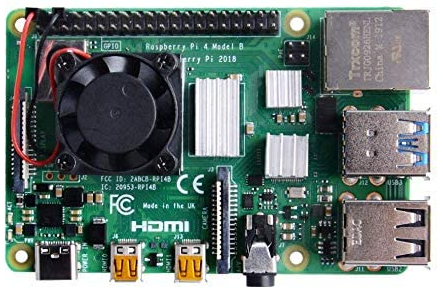
OpenWRT, it turns out is still experimenting with the 64-bit raspberry pi 4 and while nightly snapshots are available for the fearless to try, it does not yet have an official release for the model. Another complication is that nightly builds can easily get out of sync with package dependencies leaving one scratching one’s head when attempting to install a desperately needed package just a few days after the snapshot was installed. The only way out, then, is to save system configuration, re-install the latest snapshot and required dependencies and re-apply the configuration. This painful route is obviously for the determined, but determined I indeed was. A final hurdle was the runtime heat that a pi is known to generate when it works in anger. However, a casual lookup on Amazon presented several cooling solutions, involving a gamut of heat sinks, metallic casings and up to 3 fans for what is essentially a tiny CPU by any standard. One wonders if enthusiasts out there are keen on freezing the pi CPU to death. Here are some pictures of my super cool pi, complete with its fans, heat sinks and a solid aluminium case:

First things first. The pi comes with just a single wired network interface and if, like me, you hate depending on wifi for serious streaming, you quickly need to chose one of two solutions to provide the additional interface that a router essentially needs, in theory. You either use a managed switch to create at least two VLANs, treating one as a logical LAN and the other as a logical WAN (with the pi sitting in the WAN zone) or you use a USB-to-ethernet adapter attached to one of the two USB 3 ports that the pi 4 offers. These adapters have traditionally been perceived as sluggish but with evolution of technology some really fast ones, offering ridiculously high speeds of up to 5 GBPS, are now available at very affordable prices. The usb-to-ethernet solution looked easier and cleaner to me and so I went ahead and, for £14, bought a model based on an apparently popular RTL8152 chip which OpenWRT has a fully functional driver for.
Installation
Installation followed by basic set up is a rather tamed affair. You simply download the nightly snapshot image from here, run a checksum to ensure you got everything, uncompress the gz and flash it onto a standard micro sd card using one of the standard image writer tools. OpenWRT is not I/O intensive at all, making high-speed micro SD cards an unnecessary luxury. I used my favourite linux command-line utility, dd to flash the image as follows
dd if=/path/to/image/openwrt-bcm27xx-bcm2711-rpi-4-ext4-factory.img of=/dev/sdc bs=4M status=progress
Turn off wifi on your laptop and connect it to the pi using a LAN cable into its ethernet port. Insert the micro SD card in and power up the pi. In it’s default configuration, the router assigns IP 192.168.1.1 to itself which means you can access it by opening a SSH connection as root to 192.168.1.1 (no password required). The issue here is that most likely, your current home router will also have the same IP address which means if you connect your new router directly to your existing network, you end up creating an IP clash and a confused network. But why would you want to connect an upcoming router to your existing network at all? It should be remembered that it is super important to somehow let the pi have access to the internet in order to be able to install upgrades and a bunch of other packages needed to put it to any meaningful use. Moreover, the snapshot version of OpenWRT does not include its web interface, Luci which provides a comforting UI interface to people who are not too hands-on with command line interfaces. Enabling the wifi interface on the pi is one means of getting internet connectivity but if you think that is messy, you would first need to wire the pi to your existing network. It is a matter of personal choice essentially but to be able to grant internet access over the wire to your pi, you need to SSH into the router and edit /etc/config/network such that the wan section has the following content (assuming 192.168.1.1 is the IP of your existing router)
config interface 'loopback'
	option device 'lo'
	option proto 'static'
	option ipaddr '127.0.0.1'
	option netmask '255.0.0.0'

config globals 'globals'
	option ula_prefix 'fdde:3faa:67fc::/48'

config device
	option name 'br-lan'
	option type 'bridge'
	list ports 'eth0'

config interface 'lan'
	option device 'br-lan'
	option proto 'static'
	option netmask '255.255.255.0'
	option ip6assign '60'
	option ipaddr '192.168.1.XXX'
        option gateway '192.168.1.1'
	option dns '8.8.4.4 8.8.8.8'
where 192.168.1.XXX is an unused IP on your existing network that you wish the pi to be available on Once these changes are in place, power off the pi, connect it with the LAN cable to your existing router (or a switch on your network) and power is back up again. The pi should now be available over SSH on 192.168.1.XXX and should also have access to the internet. You can test internet access by pinging 8.8.8.8
Installing Packages
You need to install some basic packages and also the necessary drivers for your usb-to-ethernet adapters. In my case, the list of packages I needed has built up over time (you will understand as you read through the rest of this article) but by running the following commands, you get all packages you would need for building a router that does what mine does today
opkg update
opkg install luci wireguard luci-proto-wireguard luci-app-wireguard wireguard-tools kmod-wireguard luci-i18n-wireguard-en kmod-usb-net-rtl8152 ddns-scripts ddns-scripts-noip luci-app-ddns openvpn-openssl openvpn-easy-rsa luci-app-openvpn curl fdisk htop ca-bundle ca-certificates nano qrencode kmod-usb-net-rndis kmod-nls-base kmod-usb-core kmod-usb-net kmod-usb-net-cdc-ether kmod-usb2 mwan3 luci-app-mwan3 kmod-usb2 kmod-usb3 kmod-usb-storage kmod-usb-uhci kmod-usb-ohci kmod-usb-ohci-pci kmod-usb2-pci usbutils tcpdump vpn-policy-routing luci-app-vpn-policy-routing
Getting started
Having installed these packages, it is time to get your new router to work. I use the usb-to-ethernet adapter as my wan interface (for connecting to my ISP) and the built in ethernet port to serve my LAN. To ensure the wan can connect to your modem and borrow a DHCP address and to also make sure your LAN members can borrow DHCP addresses from your new router, configure the wan and lan sections of /etc/config/network as follows:
config interface 'lan'
	option ifname 'eth0'
	option proto 'static'
	option ipaddr '192.168.1.1'
	option netmask '255.255.255.0'
	option ip6assign '60'
config interface 'wan'
	option ifname 'eth1'
	option proto 'dhcp'
It is now time to retire your existing router. Power off both routers, replace the existing one with your new pi, connecting your modem to the usb-to-ethernet adapter and your LAN to the pi’s built in ethernet jack. Pray to God and power up the pi. It is also advisable to reboot your modem because in some cases the modem will need to shake hands with and establish a fresh session with your new router. If all has gone well, you should have a fully functional network with the usual connectivity to the internet.
Configuration
While basic configuration leading to working network is fairly easy to achieve, you most likely did not create a custom router to give yourself just the basics. OpenWRT offers a wide range of add-on features allowing you to fine tune your network in terms of privacy, reliability, availability and performance. And when things get confusing (believe me, they do) there’s a vibrant community of enthusiasts to support you with queries you may have. I wouldn’t have been able to accomplish my own working configuration without their prompt responses in situations where I felt like giving up and tossing the pi out through my window.
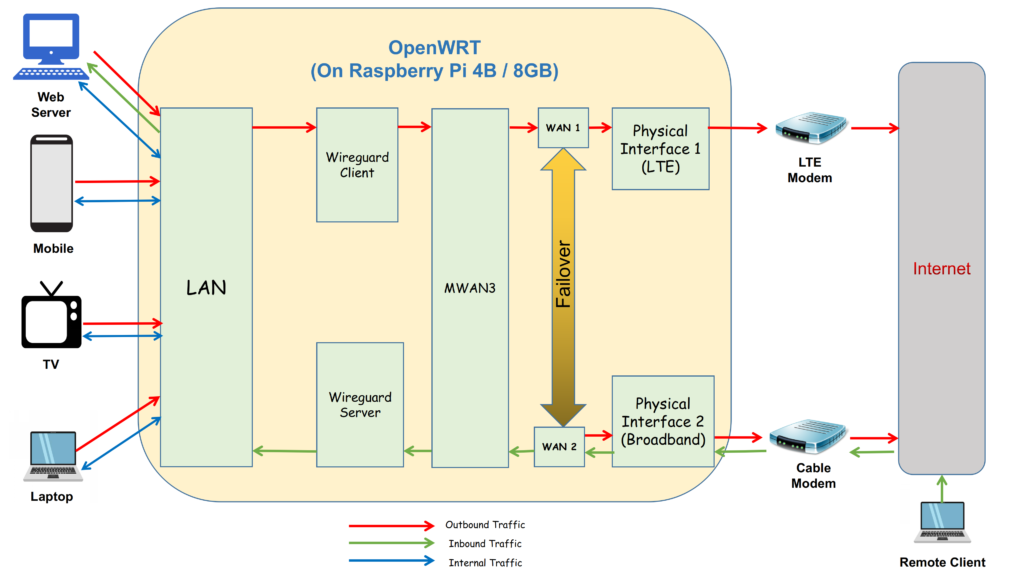
Here is a high-level diagram illustrating my set up:
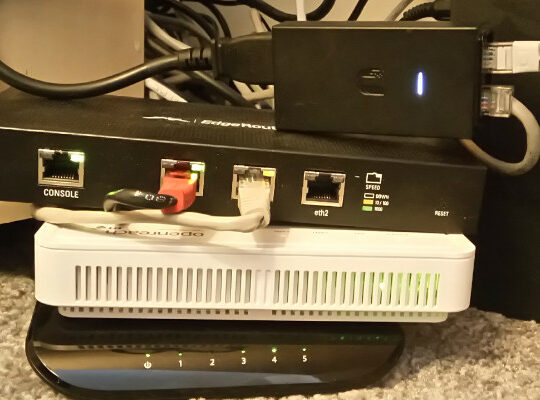
And here is what the assembled custom router looks like in real life:

What does my pi-firewall do that others don’t?
So what exactly have I made my pi do for me?
Given my ISP has randomly been letting me down (sometimes even for up to a couple of hours) in this work-from-home age when my livelihood is function of my connectivity to the rest of the world, one of my needs was to set up a fail–over internet connection. So instead of one, I now have two usb-to-ethernet adapters, one connected to my broadband ISP through a standard cable modem and the other to a LTE modem (with a SIM card) that provides a standby 80 Mbps connection over 4G. Broadband is obviously the preferred connection but if it fails, the entire home network is seamlessly failed over to the secondary internet connection provided by the LTE modem. With OpenWRT it is also possible to have multiple concurrent internet connections with weighted load balancing but I use it in fail–over mode only. This functionality is offered by means of an OpenWRT add-on package called mwan3.
My second requirement was to be able to remotely connect over secure inbound VPN into my home network from anywhere. This poses a couple of challenges, the first one being the around domain name mapping. Since most ISPs do not provide static public IPs for non-commercial connections, the challenge is to maintain a DNS record mapping the current DHCP IP with a chosen domain name. This is achieved with the help of dynamic dns service providers like dyn dns or no-ip who charge a small annual fee and an openWRT package called Dynamic DNS which constantly keeps an eye on the wan IP and publishes a new DNS record as soon as a change is detected. This keeps a domain name almost continuously mapped to the current ISP IP, thereby providing a consistent end–point to connect to remotely. The second challenge, of course, is provisioning a secure VPN server on the router. I could accomplish this using wireguard, which is an emerging VPN technology and which is known as much for being light-weight as for offering super fast VPN bandwidths. Again, wireguard is available as a set of packages that can be conveniently installed on OpenWRT.
My third requirement was to host some web servers on my LAN. These servers host my company’s web site and also a number of other applications (including a personal cloud) that I need to access remotely on a day to day basis. This part was not too difficult since OpenWRT allows one to set up simple port forwarding rules, thereby allowing icoming request packets to travel to the destination LAN member of choice. However, even this can get complicated if you also have a wireguard client, which I explain next, below.
My final requirement was to be able to tunnel all my outbound LAN traffic through a secure outbound VPN provider like CactusVPN. VPN services usually provide the recommended cloak of privacy networks should have in place, but a lot of people also use them to access geo-restricted services like Netflix. With openWRT it is not too difficult to set up a wireguard client (for outbound traffic) alongside a wireguard server (for inbound connection, described above) but by the time you get there, your routing rules assume a fair level of complexity, requiring you to superimpose clear cut VPN routing policies in order to make the packets flow down the paths you have in mind. This is where I stumbled the most. Fortunately, there is a OpenWRT package called “VPN Policy Routing” that offers a convenient GUI based configuration tool, allowing for creation of complicated routing rules in a rather convenient way. It took me some time to get my head around it but in the end I could streamline all my routing policies rather well. I now have a set-up where while the entire LAN is behind the VPN, I can still add exceptions to allow for special cases of inbound and outbound traffic (for example, allowing my work laptop, which has a VPN on its own, to bypass this additional tunnel of privacy).
Performance
Now that’s where the rubber meets the road. The question of performance brings me back to the point where I had embarked on this journey in the first place. All my effort, time and money could have potentially gone down the drains but when I first measured the the performance stats of my new router I was almost as pleasantly surprised as I was shocked when I had gathered these figures for my old ERL-3. Because it turns out that the pi 4 may look tiny but is actually an overkill for resource requirements of a router expected to serve a home or a small to medium-sized office. With inbound and outbound wireguard interfaces concurrently active I have been able to achieve consistent internet speeds of about 190 Mbps (remember, the max speed my ISP will let me go up to is only 210 Mbps). At such throughputs, I have never caught any of the cores of my quad-code processor breaching the 16% mark. I/O is negligible and of the 7.64 GB of memory available at runtime, only about 60Mb is ever used, leaving plenty of headroom for enhancements. Infact, going by what I read on forums, I understand this kind of a set up is easily capable of delivering speeds upto 800 Mbps. Here’s a glimpse into the pi’s resource usage when it was busy serving a 190 Mbps link through wireguard

The Verdict
Going by what I have experienced so far, I would strongly recommend a Raspberry Pi 4B + Openwrt combination to any networking enthusiast wanting to build a custom router / firewall, capable of matching complex requirements. Though I must admit I haven’t used OpenWRT for what it is really popular for i.e it’s handling of wireless interfaces, but even in my favourite wired mode, I couldn’t ask for more. This chemistry of open source firewall with tiny-but-mighty hardware does seem to represent a breath of fresh air for networking enthusiasts like me who do not like being constrained in jails of proprietary firmware and who are keen on spinning innovation based on extensibility of platforms. And I remain quite optimistic that very soon we will have an official, stable OpenWRT release for the Pi 4B model which should be super easy to upgrade to.