

The Problem With VPN Service Providers
VPN services need no explicit introduction. An average internet user would most likely have used services of a VPN provider at some point or the other to access geo-restricted application, to throw a cloak of anonymity around their online activities, to hide IP addresses from prying eyes of authorities or to simply switch into an ultra-safe browsing mode. Not surprisingly, over the past decade or so, there has been a huge growth in the number of VPN service providers with quite a few popping up every month. However, amid all this hype and intense competition, most of these services are littered with cons related to costs, availability, connectivity and most importantly, the levels of trust one can have in them. In the world of VPNs, trust is of paramount importance since the weakest link in a VPN-based anonymity chain is the log data stored by a VPN service provider. Having spent most of my career as an application developer/architect, I know software engineers will almost never write an application that produces no logs at all. Application logs are to software what black boxes are to an aircraft, which make them almost indispensable in a software development lifecycle. Essentially, this means all online activity that you pipe through a VPN application will almost certainly be recorded somewhere, even if the logs are intended to be used just for debugging purposes. Every VPN service provider out there will go all out to boast about their zero-logs policy much before they have made even made the basic functionality of their applications clear but I for one, would take all that with a pinch of salt. Under reasonable pressure from empowered authorities, I am sure a business-minded VPN provider will quickly buckle to give away those logs, breaching your trust and defeating the entire purpose of a VPN connection.
Own Those Logs
Whilst you can't gate-crash into a VPN provider's premises to delete their logs, you definitely can address the problem by hosting your very own VPN server. To some, this may seem like killing a fly with a sledgehammer and outrightly far fetched to some others, but it turns out building and hosting a personal VPN server is not complicated at all. A custom VPN server, living inside a cloud-based container, places you in complete control of the client and server side of things, making you the absolute master of any logs that you may choose to write in your VPN server. With elastic compute engines of the kind made available by any cloud provider, not only do you control who can have access to your VPN logs, you can even choose to delete your entire VPN container if need be, leaving no traces behind. And all of that, in a matter of seconds.
An AWS EC2 instance offers a very convenient platform for hosting a custom VPN server. A low end t2.micro instance running a standard linux OS like Ubuntu 20.04 should be sufficient to provide the compute resources needed by a VPN server. The following sections provide details on how a VPN server can be built from scratch on an AWS EC2 instance.
OpenVPN vs Wireguard
Before we jump into building a VPN server, lets take a brief look at the software options we have. OpenVPN is by far the most popular opensource VPN software out there. It has been around for about a couple of decades now, has very wide adoption and is well supported by an active community of developers. Wireguard, another open source VPN technology, on the other hand is relatively modern, with a promise of massive speed, efficiency and security improvements over OpenVPN. Reasonably lightweight, wireguard is way leaner, more efficient and comes with an out-of-the-box offer of much higher speeds and enhanced security. The wireguard application has been written with just 4,000 lines of code compared to OpenVPN that runs into over 40,000. More and more VPN service providers are leaning towards wireguard, so much so, that within the next few years wireguard is all set to emerge as the prime VPN technology.
While it is very much possible to host a personal VPN server using OpenVPN, in light of the above considerations, I decided to base my prototype on wireguard. It pays to be futuristic, I guess.
Assumptions
For the purpose of this write up and to ensure I don’t hopelessly meander out of context, I have made the following assumptions:
1. The reader is familiar with basic concepts of AWS, particularly EC2.
2. The reader is familiar with how a VPN works, how it hides your public facing IP address and how it encrypts data in transit.
3. The reader is aware of basic networking concepts like port forwarding, IP tables etc has also has basic knowledge of key-pair based encryption.
4. The VPN client is a Linux box running Ubuntu 20.04. However, nothing prevents the reader from copying the wireguard client-side configuration and using it to configure a wireguard client on a Windows laptop or a Mac-based system. For that matter, even a home or company router can be configured on similar lines to hook up as a client to the VPN server we are creating here. When a router at the edge of a LAN becomes a wireguard client, all outbound traffic from the LAN is tunneled through the VPN server.
Overview
The following diagram shows an overview of this idea from a networking point of view:
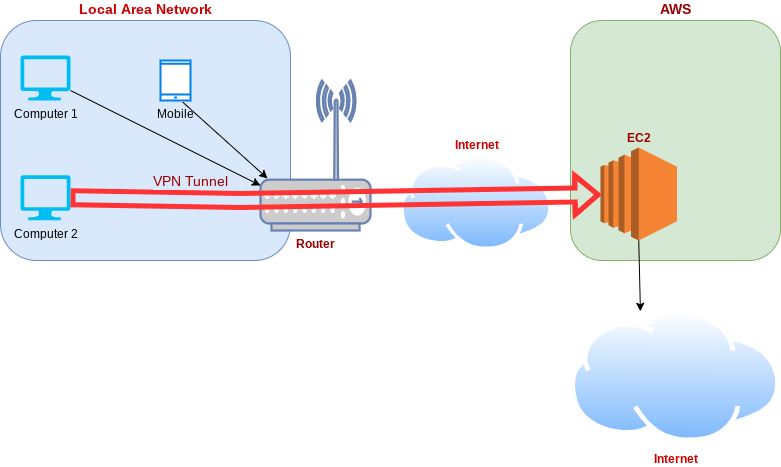
Cloud (Server-Side) Setup
Login in to your AWS account and provision a t2.micro / Ubuntu 20.04 EC2 instance for yourself. Allocate a static (Elastic) public IP address in AWS and associate it with your EC2 instance. SSH into the EC2 instance and on the command line run the following commands:
sudo su
apt update -y
apt upgrade -y
apt install wireguard
cd /etc/wireguard
Generate the server-side public and private keys:
umask 077; wg genkey | tee server_privatekey | wg pubkey > server_publickey
The above command will create a server-side public key (server_publickey) and a server-side private key (server_privatekey) Now create a server-side wireguard configuration file /etc/wireguard/wg0.conf with the following content (portions in blue to be replaced with appropriate content as explained):
[Interface]
Address = [wireguard vpn CIDR e.g 192.168.6.1/24]
ListenPort = [wireguard server listen port e.g 41194]
PrivateKey = [content of server_privatekey]
PostUp = iptables -t nat -A POSTROUTING -o eth0 -j MASQUERADE
PostDown = iptables -t nat -D POSTROUTING -o eth0 -j MASQUERADE

[Peer]
PublicKey = [content of client_publickey (see below)]
AllowedIPs = [allowed IP CIDR e.g 192.168.6.2/32]
The server_publickey generated above will be used in the client configuration (see below in the client configuration section) To ensure the wireguard tunnel allows for internet connectivity and acts as a gateway, it is necessary to ensure network packets received in the tunnel are forwarded to their destinations. To achieve this, create a file /etc/sysctl.d/10-wireguard.conf with the following content:
net.ipv4.ip_forward=1
Port forwarding will now be enabled when the server reboots. To enable it on a running server, execute the following command:
sudo sysctl -p /etc/sysctl.d/10-wireguard.conf
Now enable the wireguard server as a daemon, start it up and view its running status for ensure there are no errors:
systemctl enable wg-quick@wg0
systemctl start wg-quick@wg0
systemctl status wg-quick@wg0
In the security group for the EC2 instance add a "Custom UDP" inbound rule to allow incomming traffic on the wireguard "ListenPort" configured above e.g 41194. Also double-check to ensure the EC2 instance has access to the internet (this is usually the default). Your wireguard server is now up, running and ready to serve.
Client Setup
Assuming the wireguard client is a linux box (ubuntu 20.04 was used in my prototype), open a shell prompt and run the following command to install wireguard
sudo apt install wireguard wireguard-tools wireguard-dkms -y
Generate the client-side public and private keys as follows:
umask 077; wg genkey | tee client_privatekey | wg client_pubkey > client_publickey
The above command will create a client-side public key (client_publickey) and a client-side private key (client_privatekey). The client_publickey has already been incorporated in the server configuration (see above). Now create a client-side wireguard configuration file /etc/wireguard/wg0.conf with the following content (portions in blue to be replaced with appropriate content as explained):
[Interface]
Address = [wireguard client CIDR e.g 192.168.6.2/24]
PrivateKey = [content of client_privatekey]

[Peer]
PublicKey = [content of server_publickey (see above)]
AllowedIPs = [wireguard server CIDR e.g 192.168.6.0/24]
Endpoint = [wireguard server public IP e.g 12.34.56.78]:[wireguard server listen port e.g 41194]
PersistentKeepalive = 15
Now start the wireguard client connection as follows:
wg-quick up wg0
That's it. If all has worked to plan, your client should have shook hands with the VPN server and the two should have established a secure, encrypted tunnel over the open internet for communication. The client should be able to access the internet through the VPN server for which we have enabled port forwarding above.
Testing the connection
To test the connection, try pinging your client from your server and vice versa. For the pings, remember to use IP addresses assigned to the server and client from the CIDR ranges we configured above. Another way to test is to look up your public facing IP address (using sites like www.whatsmyip.com) and to ensure that the IP shown is that of the AWS EC2 instance rather than that assigned to your router by your ISP. I used this link to fetch details of my public facing IP in JSON format and here is the output I received which clearly shows my VPN client connected to the internet through a North American IP address, 3.143.50.110. This is also the elastic IP address I associated with my EC2 instance in AWS:
{
status: "success",
continent: "North America",
continentCode: "NA",
country: "United States",
countryCode: "US",
region: "OH",
regionName: "Ohio",
city: "Dublin",
district: "",
zip: "43017",
lat: 40.0992,
lon: -83.1141,
timezone: "America/New_York",
offset: -18000,
currency: "USD",
isp: "Amazon.com, Inc.",
org: "AWS EC2 (us-east-2)",
as: "AS16509 Amazon.com, Inc.",
asname: "AMAZON-02",
mobile: false,
proxy: false,
hosting: true,
query: "3.143.50.110"
}
Disconnecting
To disconnect from the VPN, run the following command:
wg-quick down wg0
Cost Considerations
This kind of a custom VPN setup only involves charges levied by the cloud provider (like AWS) that hosts the compute engine. In the case of AWS, this may be made up of EC2 charges, storage charges (for the EBS volume attached to the EC2 instance), and data ingress and egress charges. However, my rough calculations based on a t2.micro instance in EC2 throughputting 1 TB of internet traffic anually show that the annual costs are still going to be lesser than the average annual charge levied by an average VPN service provider. Also, readers may consider cloud providers like Oracle that provide two t2.micro type instances as a "forever free" offering in the free tier. VPN servers running wireguard do not consume a lot of resources which convinces me a t2.micro instance or its equivalent should suffice in most cases.
Performance Considerations
From inside of my EC2 instance setup in the AWS us-east-2 region, I could achieve speeds of about 560 Mbps using the linux command line speedtest-cli tool. With a wireguard client based in London, my max bandwidth was 190 Mbps over a 210 Mbps connection provided by my London-based ISP. It is clear therefore that the bottleneck in my case was my own ISP, with negligible loss of bandwidth on account of VPN tunnelling. This observation is quite in line with speed and efficiency claims made by developers of wireguard. Also, during my speed test, the EC2 instance showed just 14% CPU utilization with ample memory to spare. Therefore, in my opinion, this setup is quite a workable option from a performance point of view as well.
Locational Considerations
VPN service providers usually offer a range of globally distributed servers to connect through. This may be required if you need to present a particular geo-location to an application that restricts access based on the client's geographical location. The same feature can be built into your custom VPN service by creating an AMI (Amazon Machine Image) of your EC2 instance and spinning up replica instances in other AWS regions of choice. Most users would need no more than two or three such locations and therefore a similar number of EC2 instances, which ties well with cost considerations I have discussed above.

Wonderful, very technical..Keep it up Deepak Ji..
Hi
I did all steps.
executing command “systemctl status wg-quick@wg0” will return :
root@ip-172-31-24-236:/home/ubuntu# systemctl status wg-quick@wg0
● wg-quick@wg0.service – WireGuard via wg-quick(8) for wg0
Loaded: loaded (/lib/systemd/system/wg-quick@.service; enabled; vendor preset: enabled)
Active: active (exited) since Thu 2022-11-03 06:31:06 UTC; 23min ago
Docs: man:wg-quick(8)
man:wg(8)
https://www.wireguard.com/
https://www.wireguard.com/quickstart/
https://git.zx2c4.com/wireguard-tools/about/src/man/wg-quick.8
https://git.zx2c4.com/wireguard-tools/about/src/man/wg.8
Process: 464 ExecStart=/usr/bin/wg-quick up wg0 (code=exited, status=0/SUCCESS)
Main PID: 464 (code=exited, status=0/SUCCESS)
Nov 03 06:31:06 ip-172-31-24-236 systemd[1]: Starting WireGuard via wg-quick(8) for wg0…
Nov 03 06:31:06 ip-172-31-24-236 wg-quick[464]: [#] ip link add wg0 type wireguard
Nov 03 06:31:06 ip-172-31-24-236 wg-quick[464]: [#] wg setconf wg0 /dev/fd/63
Nov 03 06:31:06 ip-172-31-24-236 wg-quick[464]: [#] ip -4 address add 192.168.90.1/24 dev wg0
Nov 03 06:31:06 ip-172-31-24-236 wg-quick[464]: [#] ip link set mtu 8921 up dev wg0
Nov 03 06:31:06 ip-172-31-24-236 wg-quick[464]: [#] iptables -t nat -A POSTROUTING -o eth0 -j MASQUERADE
Nov 03 06:31:06 ip-172-31-24-236 systemd[1]: Finished WireGuard via wg-quick(8) for wg0.
root@ip-172-31-24-236:/home/ubuntu#
At the client side i have only TX , this is what it looks like:
Protocol: WireGuard VPN
Uptime: 0h 5m 19s
RX: 0 B (0 Pkts.)
TX: 7.55 KB (51 Pkts.)
IPv4: 192.168.100.1/24
Thank You.
Hi,
Apologies for the delayed response. Any misconfiguration will only result in zero activity on the client side. There are a number of things you need to double-check, like key pairs, IP addresses, cloud ingress and egress rules etc. Additionally, some cloud instances (based on available images) have an internal firewall built in that will not allow wireguard VPN to function until altered. To get such instances to work with a personal VPN server, locate the file /etc/iptables/rules.v4 and remove the following lines from it:
-A INPUT -j REJECT –reject-with icmp-host-prohibited
-A FORWARD -j REJECT –reject-with icmp-host-prohibited
Then either reboot or (to apply the changes without rebooting), run the following command:
iptables-restore < /etc/iptables/rules.v4 Do let me know how it goes. I can confirm, my set up (based on my writeup), still works and I use it on a day to day basis. Happy to work with you on this to resolve your problem.